


7 Stages of Mobile App Development Process: Full Guide
If you’re thinking about diving into the world of mobile applications, this is the single most important thing you need to grasp: the mobile app development process itself. It’s not just a checklist. It’s actually the whole crucial workflow, and honestly, missing even one step can make the whole system collapse.
The global mobile app market, according to some analyses, might top a whopping $378 billion by 2026. That insane growth really brings into sharp focus just why recognizing and respecting every single stage of this development cycle is an absolute necessity.
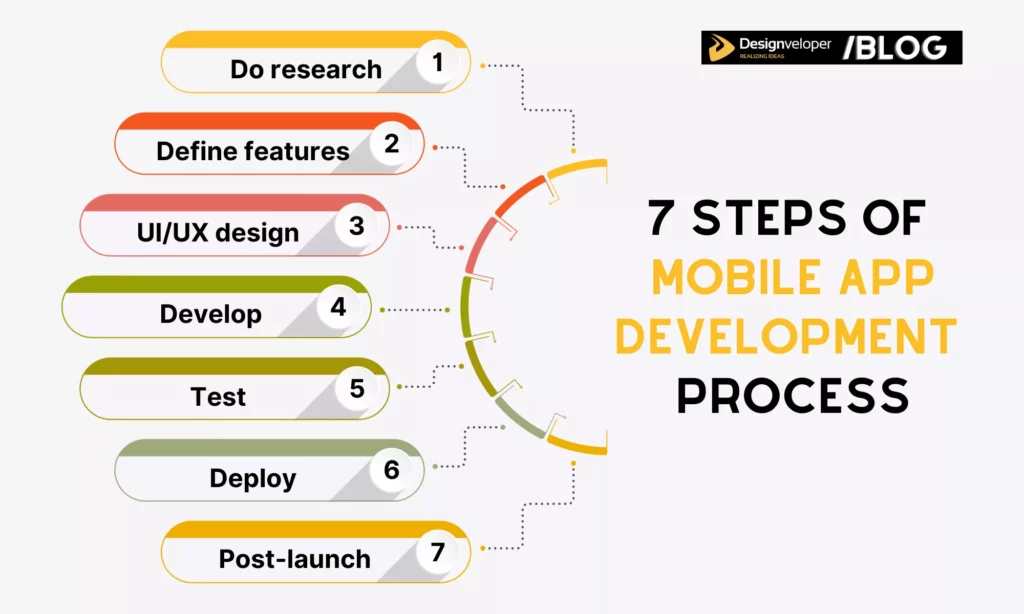
7 Stages of the Mobile App Development Process (Mobile App Development Lifecycle)
Now, we’ll dive deep into each key stage to build a mobile app effectively.
Step 1: Research and Strategy Development
Mobile apps are considered “a new norm” in this digital era. But it doesn’t mean your company needs one unless this mobile-based product deals with the existing problems of the target audience and boosts the company’s overall development. Therefore, forming ideas and doing thorough research to go online is the first crucial step; it accordingly mirrors your demands, ultimate goals, and the benefits of building a mobile app.
Define the App Idea and Business Goals
To develop a proper business idea, you should ask one big question: What are the primary intentions behind a potential mobile app? This question can be broken down into smaller chunks to help your company understand its current needs better:
- What are existing problems that impact lots of people (i.e., your business and target niche) and require a digital solution?
- Which unique values can a mobile app bring to end-users?
- Which opportunities and challenges show up provided your company goes mobile?
Answering these questions, you can identify your app’s ultimate goals that tally with your end-users’ demands and business culture. Then, sketch a preliminary set of features your app many have to achieve those goals.
But is your idea truly feasible? After defining an app idea, don’t rush to design and development. It’s because you honestly don’t know whether the market – or, more specifically, your target users – will actually welcome your app, let alone pay for it. So, doing market and competitor research is necessary.
Market Research
To a wider extent, you need to conduct market research to improve your understanding of the market and its current trends. Further, this approach helps optimize your business opportunities and approach to potential customers.
When doing this essential market research, what should you really be zeroing in on? Normally, you tend to focus on something like:
- Target users
You should learn who your app is actually for. You need to build a mental picture of them. For example, are they young office workers looking for a stress reduction solution? Or are they the retired demographic demanding instant, reliable medical assistance?
Doing research helps you understand their key pain points, their specific day-to-day needs, and their preferred devices (are they iPhone loyalists or Android first?). Get this wrong, and you’re building an amazing app for people who don’t exist.
- Market trends
You’ll learn which key technologies or market shifts will actually shape the future of mobile app development. Is your category about to be completely disrupted by GenAI and LLM integration? Is it about social listening features? You need to know that your technology choice isn’t going to be obsolete six months after launch. This part is, you know, kind of like future-proofing your investment.
Competitor Analysis
Analyze the pros and cons of your competitor’s mobile app, and you’ll devise a suitable competitive strategy. Here’s what you need to do:
- Identify competitors: Your rivals can be direct (aka similar apps solving exact problems you do) or indirect (aka alternatives users might consider using).
- Analyze SWOT: After narrowing down the top 3 to 5 competitors in your domain, you should perform a simple SWOT analysis to learn about what they’re doing well and, equally important, what their users often complain about. This helps you find those crucial opportunity gaps to successfully wedge yourself into the market.
- Analyze ASO (App Store Evaluation): This involves analyzing the keywords, description, and screenshots of your competitors to see which search terms they are ranking for and how they describe their apps to rank top. Don’t forget to analyze reviews from real users on the App Store or Google Play. This helps you derive valuable insights into what people are most interested in or disappointed about.
Acquiring key findings, you can adjust your app idea to make it truly feasible. But remember that your business’s app idea should have original concepts instead of copying patterns or models of other successful counterparts.
FURTHER READING: |
1. What is Hybrid App Development? |
2. The Product Design Process: A 6-Step Guide |
3. An Overview of App Development Project Management |
Step 2: Define Features and Requirements of App

Once you’ve got that core idea and market insights nailed down, the next absolutely crucial step is drawing the blueprint. This is where we identify the core features, the necessary technical specifications, and all the other non-technical requirements your new app will need.
Feature and Functional
Choosing the right functionality can be, well, kind of tough. With the sheer variety of apps out there, it’s super easy to get feature creep—that constant urge to add just one more thing. Don’t fall into that trap! It’ll kill your timeline and budget faster than you think.
If you’re struggling to pare it down, here are a few questions that might actually help anchor your decision-making process:
- What’s your ultimate, bottom-line business goal for this app?
- Is this app primarily for a mass audience (B2C) or a more specific, smaller group (B2B, internal)?
- Will it be predominantly text-based (like a finance tracker) or heavily reliant on graphics, streaming video, or AR (like a game or virtual tour)?
- What are the hard budget restrictions?
- Are you set on developing the app in-house or will you need to outsource to an expert team?
The key here is constantly keeping your primary goal in mind. For instance, if your whole intent is just a super easy, fast way for users to order food or hail a taxi next time they need one, it’s honestly best to stick to simple, rock-solid features. Don’t spend too much time dreaming about augmented reality menus for your Version 1. Remember this: choosing the right feature set is key for a streamlined mobile app development process!
Technology Stack
So, you’ve got your features all lined up. Great! Now, it’s time to pick the right tech stack to translate those ideas into reality. This is basically the full kit: the programming languages, the frameworks, and all the little tools needed to make those features come alive.
Your choice here isn’t just a technical detail; it’s going to majorly affect your development time, the final cost, how well the app performs, and its future scalability. Consider these factors will steer you right:
- App Type: A native iOS or Android app demands platform-specific knowledge and tools—think Swift for iOS or Kotlin/Java for Android. If you want to hit both stores with one codebase, you’ll need expertise in cross-platform technologies like Flutter (using Dart) or React Native (using JavaScript).
- Performance Needs: Does your app require crazy high performance? Things like mobile games, AR/VR experiences, or complex financial trading apps need meticulous consideration. If speed is absolutely paramount, native development may be the best bet.
- Team Expertise: What are your team’s strongest technical skills? If you have, say, JavaScript developers, choosing JS frameworks (like React Native, Node.js for backend) is often the most efficient path.
- Budget/Time: If a short time-to-market and lower initial costs are the biggest factors, cross-platform could potentially save you a lot of time and money, though there are tradeoffs, naturally.
Software Development Methodology
A methodology, at its core, gives your team the principles and best practices to manage and implement the project without descending into utter chaos. So, you absolutely must adopt the best methodology for your project.
The two giants are generally Agile and Waterfall. Waterfall, being sequential (one step leads to the next), is more popular for projects where the requirements are crystal clear and unlikely to change much. However, in the fast-moving app world, Agile approaches (like SCRUM or Kanban) are now widely adopted—they’re basically lifesavers—especially if your requirements are unclear or likely to evolve as users give feedback.
Product Roadmap
Next, you’ve got to build a detailed product roadmap. This roadmap visually describes your entire product vision, its direction, and what things need to be prioritized over time.
For mobile app development, this is the document that helps the whole team—not just the developers, but the marketing folks, too—understand the product strategy (target audience, key business goals, etc.). It clarifies the most critical value that needs delivering, sets realistic release dates, and keeps everyone confidently on the right track.
Raw Estimation
The final thing you must do in this stage is to estimate the cost, time, and resources you need to complete a project or build a specific feature. There are various estimation techniques you may adopt, like Analogous Estimation, Expert Judgment, or Three-Point Estimation.
Here are some tips summarized from our experience to help you make better estimations:
- There should be a meeting between development and business teams to discuss and define goals as well as commitments beforehand.
- The estimation team needs to understand the functional and non-functional requirements of your project.
- You need to prioritize the most crucial requirement and clarify all assumptions.
If you decide to outsource the project, you should choose the right mobile app development company to ensure precise estimations and avoid hidden stuff. At Designveloper, we have adopted different techniques to estimate essential resources for your project, typically Analogous Estimation and Planning Poker.
We use Analogous Estimation for new projects by working closely with your representative to break the project down into a list of features. Meanwhile, we use Planning Poker for Agile projects to estimate all tasks that need finishing within the sprint by letting each member give a story point value that reflects the effort needed.
Further, as a leading app development company in Vietnam, we have accumulated years of experience working on different projects of all sizes. This allows us to build an internal library of historical data that helps us precisely predict the time, cost, and resources for each feature. Wanna help for a detailed estimation? Tell us your requirements from now!
Recommended reading: Mobile App Design Process: How does it change in 2023?
Step 3: UI/UX Design
UX (User Experience) and UI (User Interface) app designs play an important role in deciding how a mobile app works and looks. An intuitive layout and a flawless interface will provide end-users with positive experiences, accordingly boosting overall user satisfaction and retention rate.
At this phase, UX/UI designers and your company will build:
- Customer journey map
This visually analyzes the user flow through your potential app, from discovering a certain product or service on the app to payments.
- UX design
This involves building wireframes and clickable prototypes.
A wireframe is like a blueprint of your mobile app, which includes the structure, layout, and connections between features of the product. Designers just need to sketch black and white outlines to help the development team and stakeholders understand how the app should look.
Then, designers turn the static wireframe into a clickable prototype that gives interactive experiences by stimulating a real app. Its purpose is to validate the user experience (UX), test the flow, and identify usability issues through testing with stakeholders or real users.
- UI design
This involves adding visual elements to the prototype to make it attractive and aligned with your brand identity. Building visual design includes creating an easy-to-navigate interface, choosing color palette based on your brand guidelines, selecting typography, designing consistent icons, and specifying the style and placement of imagery and graphics on your app.
Recommended reading: UX Design Process: What You Need To Know
Step 4: Mobile Development

So, you’ve got that high-fidelity design. Now it’s time to start building. This is the stage where we actually bring the application to life using the specific technology stacks we picked out way back in Step 2.
Environment Setup
Before anyone writes a single line of feature code, you absolutely need to set up the development environment. This ensures that every single developer, regardless of where they are or what machine they use, is working with the exact same dependencies, libraries, and tools. This prevents those annoying, time-sucking “but it works on my machine!” disasters.
The setup usually involves a few vital tasks:
- Version Control: Set up the project in a version control system—like Git, hosted on GitHub or GitLab. You can track every little change made by the team and always revert back to a previous, functional version if something goes terribly wrong.
- IDEs and Dependencies: Install and configure the Integrated Development Environment (IDE), whether it’s Android Studio, Xcode, or VSCode. Then, using package managers like npm/Yarn, Gradle, or CocoaPods/Swift Package Manager to pull in all those necessary external dependencies and libraries.
- Virtual Devices: Finally, set up and test emulators and simulators. These are virtual devices your team needs to run the app quickly without constantly needing a physical phone or tablet, ensuring the app performs smoothly across a wide range of OS versions and screen sizes.
Front End (Client-Side)
The Front End covers everything your target users actually see and interact with on their mobile devices. The frontend developers are basically the magicians who write the code to translate the beautiful layouts and interactive elements from the design files into a tangible app.
Beyond just the look and feel, they’re responsible for things like:
- Handling user input and the local app logic.
- Managing the data—or the “state”—that your app is currently using and displaying.
- Integrating the front end with the back end via API calls to smoothly exchange data.
- Optimizing the app to correctly use specific hardware features, like cameras, GPS, or biometrics.
- Ensuring the app follows platform-specific design guidelines—a crucial detail for acceptance into the App Store or Google Play.
Back End (Server-Side)
The Back End, on the other hand, is the silent engine; it covers everything that supports your app behind the scenes. This is where the heavy lifting happens, protecting and processing your users’ data.
This includes:
- Running the core business logic on the application server (often built with tools like Python/Django, Java/Spring, or Node.js) to process requests coming in from the app.
- Interacting with databases to securely store and manage data—user profiles, transactional information, and all that good stuff.
- Building custom or handling standard APIs to connect the front end and the server for all that necessary data exchange.
- Making sure data is managed securely through best practices, including proper authorization, encryption, and maybe even two-factor authentication.
DevOps
You’ve got the code, but you want to deploy frequently and keep the quality high? You need DevOps. Adopting DevOps practices is crucial if your goal is faster development cycles and frequent releases. This methodology basically automates much of your development process, which is a massive win.
It involves two key ideas:
- CI (Continuous Integration): This automatically merges code changes into a central code repository. Then, a CI server (like GitHub Actions, GitLab CI, or Jenkins) automatically runs your build processes and tests (like unit tests or UI tests) to quickly catch errors. It’s like having an automated quality control check every time someone commits code.
- CD (Continuous Delivery/Deployment): This takes the well-tested, integrated code and automatically prepares and packages it into a deployable app artifact (.apk or .ipa file).
Don’t forget to set up monitoring and analytics tools! You need to track the app’s performance, user behavior, and potential issues in real-time once the app is live.
Step 5: Testing

Testing is an essential step to check how the app’s features work or whether the app has any bugs. You and the development team can easily follow the testing progress through software as QA Touch and Testlink. But what kinds of tests should you perform? Let’s see:
- Unit Testing: This tests the small parts of your app separately, like individual functions, classes, or code modules. Accordingly, developers often write code to verify whether a specific piece of code works correctly as expected. This testing type is often conducted automatically.
- Functional Testing: This tests whether the app’s features work precisely according to requirements and tech specs. Accordingly, the development team will manually or automatically test data input, processing, and output (like testing a feature of adding an item into a cart.
- Performance Testing: This tests how your app performs under several situations. It focuses on assessing the app’s speed, responsiveness, and stability, especially under heavy workloads.
- Security Testing: This tests all aspects that can lead to vulnerabilities in your app, like loopholes in login or improper encryption for sensitive data. This ensures your app performs safely and protects data from cyberattacks, especially when your business is in highly regulated industries, like law, finance, or healthcare.
- User Acceptance Testing: This tests whether you (as a client) or real end-users think the app is usable, meets ultimate goals, and gets ready for market.
Step 6: Deployment
When the product is ready for publishing on the App Store and Google Play Store, the app development company will help you prepare essential documents and materials to do so.
- App Store & Google Play Submission
To submit products to the Apple Store, your company should follow the following steps:
- Register for the Apple Developer Program.
- Ensure your product complies with App Store guidelines.
- Conduct beta testing for your app with TestFlight.
- Log in to App Store Connect and provide basic information about your app (e.g., name, category, or pricing).
- Upload your app’s screenshots.
- Publish your app through Xcode.
Your app will be reviewed by Apple to ensure it suits the Apple Store’s rules. You can use this guide for more details: https://developer.apple.com/ios/submit/
To release Android apps to the Google Play Store, your company needs to provide the required information about the privacy policy or age/geographic restrictions. Marketing materials (i.e., screenshots or videos) and configuration requirements are important as well. For more details, you can read the article from Google Play: The Future of Android App Bundles here.
- App Store Optimization (ASO)
ASO is a crucial process to increase your app’s visibility in the app stores and attract target users to it. So, to rank highly in search results, you have to optimize keywords by researching frequently used terms and inserting high-traffic keywords into your app’s title and short description.
Further, optimize conversions by focusing on visible elements on the store listing, like your app’s icon, screenshots, and videos.
- Launch
Once everything is done, it’s time to make your app publicly available for download. Don’t forget to plan and perform post-launch marketing campaigns (through paid advertising, social media campaigns, and public relations to encourage initial downloads).
Step 7: Post-Launch Support
After your app’s release, the development team will manage the product’s statistics, gather user feedback, and discover possible flaws. These tasks are vital for further app improvements and maintenance to keep your app attractive and scalable.
Designveloper’s Mobile App Development Process
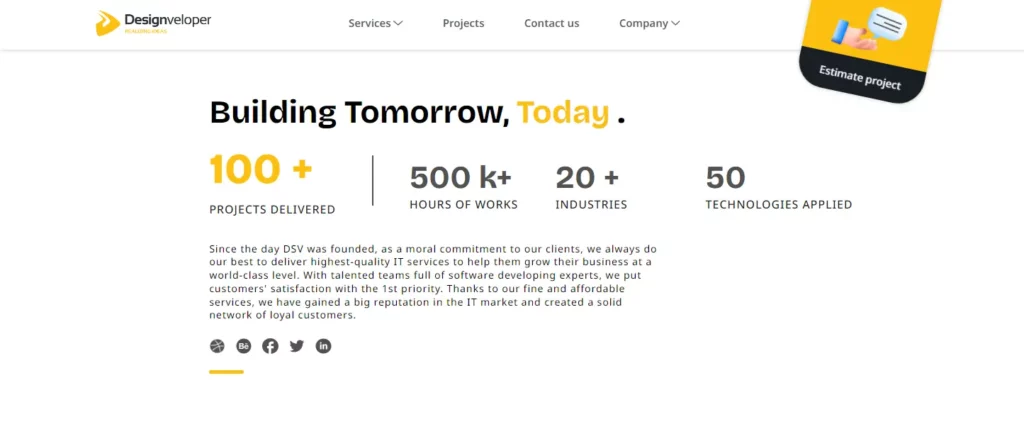
As the leading web and software development company in Vietnam, we particularly shine in mobile app development. Our method guarantees superior quality mobile applications that focus on users. We have the experience to make your ideas a reality after we have completed over 100 projects and worked nearly 500,000 hours.
The mobile application market is enjoying a boom. It is projected that by 2024, it will create well over $522 billion in earnings. This growth highlights the importance of a robust mobile app development process. We take a complete approach at Designveloper to guarantee achievement.
The development of mobile applications by Designveloper is delivered through a detailed procedure. This assures that the applications are of superior quality and easy to use.
Accordingly, we start by gathering and analyzing our clients’ requirements to recognize their needs and build a set of truly critical features. We then adopt well-known techniques like Agile & Scrum, Pair-Programming, and Pomodoro to conduct UI/UX design and full-stack development effectively. Also, we also run different types of testing to analyze the performance of the apps and make necessary adjustments just before we launch the product.
We don’t just end there, after the app is launched. Instead, we continue gathering and interpreting user feedback. This information allows us to update the apps and mesh new technologies (e.g., AI) inside to keep the app updated.
Do you want to build top-notch applications with us? Contact us and receive a detailed consultation!
Also published on

Share post on