


What Is Git and How Does Git Track Our Project Files?
What Is Git?
Git is a source code manager and also a powerful tool for tracking changes in our development project. Being able to understand and use Git as a source code management tool has become an absolutely essential skill for all programmers and developers. Git helps us to manage the code and files in our projects as we develop new features, also helps us to find and fix problems, and simplifies collaboration with other developers, whether they’re in our office, or around the globe.

Let’s cover the essential techniques we need to add files to a Git repository, track changes to those files over time, and view and compare previous versions of the files. Git has helped a lot of developers to handle complex projects. Whether our goal is to manage our own code, collaborate with other developers, or contribute to open-source projects, Git is a powerful tool that can help us.
FURTHER READING: |
1. Hash Values (SHA-1) in Git: What You Need To Know |
2. HEAD pointer in GIT: What You Need To Know |
3. What are Git Concepts and Architecture? |
4. .gitignore: How Does it Work? |
Some Git Configurations
There are 3 places that Git stores configuration information, and it depends on how widely we want these configurations to apply.
- The first and broadest is the system-level configuration. These are configurations that will apply to every user of your computer by default. Each user could then override it with their own custom configurations, but these are the default if they don’t.
- These also are configurations that will apply only to a single user, which is going to be most of us most of the time, working as a single user on a machine. On Unix, that’s going to be in our home directory, inside a file called .gitconfig.
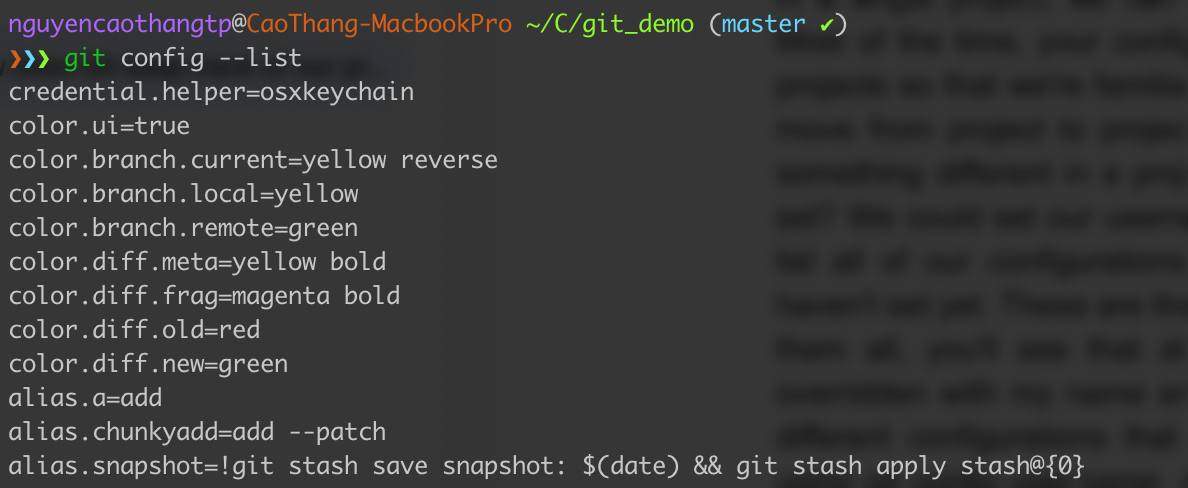
- The third-place that we can store configurations is on a project-by-project basis. In a single project, we can have some configurations that only apply the scope of that project. Most of the time, we probably want our configurations in all of our projects so that we’re familiar with them, and it all kind of looks the same as we move from project to project. But there may be special cases where we want something different in a project. So what are the kinds of configurations we can set? We could set our username, and email. We could type git config –list, and it will list all of our configurations. We’ll see that there’s a lot in there, a lot that we haven’t set yet. These are the system defaults. Besides, you can find out more about Git at https://git-scm.com/
How Does Git Keep Track of Our Project Files?
Once we have Git installed and configured, the next step is to initialize Git in a project. The way we’re going to do that is with a Git int command called “git init”. That’s short for “initialize”. So we’re going to initialize or create a project to use Git. Before doing that, we first need to navigate to the project’s folder or if you don’t have it, let’s create a new directory. We want to make sure that we’re located inside the project directory before we actually execute this command.
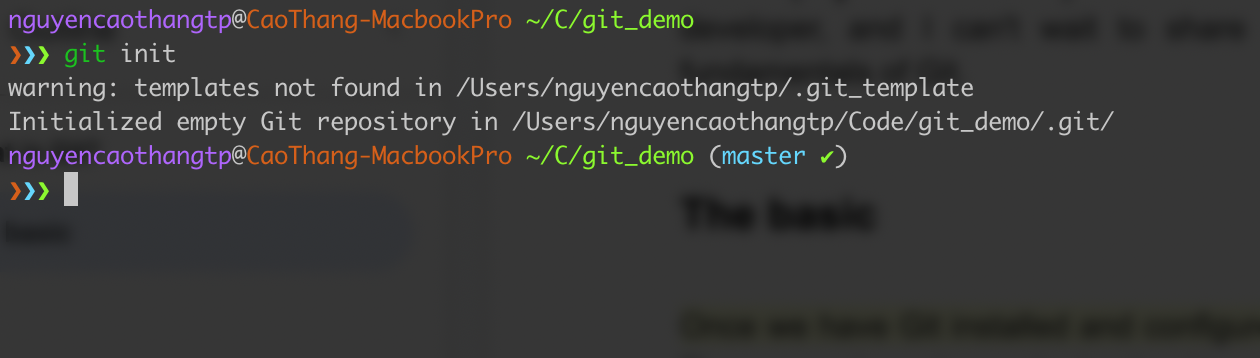
When we hit Enter, we will see it comes up and tells us an initialized empty Git repository inside that project.

If we look over here, we’ll see there’s nothing inside. That’s because of the dot file (the hidden files). The dotfiles won’t show up by default. If we type ls -alh, the terminal will show all files including the hidden ones in the listing. So now we see a listing of all the files in the directory as well as directories that start with a period. This invisible Git directory is where Git does all of its tracking. Having that directory lets us know that the Git repository has been initialized and is ready for us to use.
Q: What goes inside that directory?
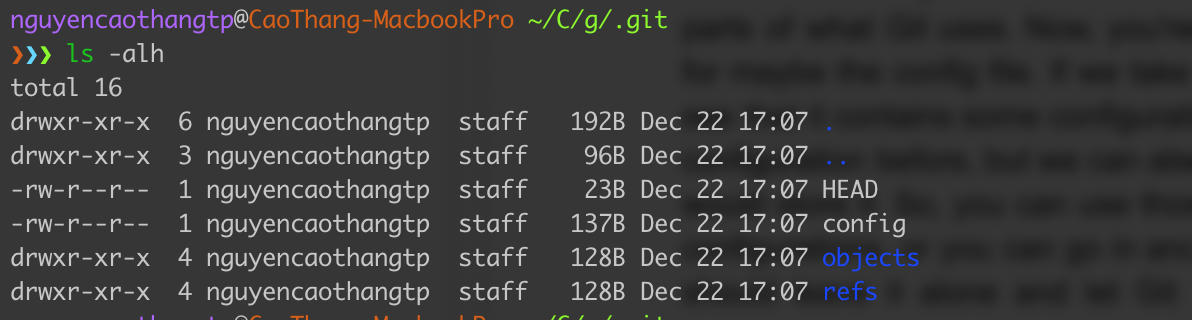
Let’s go inside that .git directory and explore. We can see that Git is keeping track of HEAD, config, objects, and refs. Other new folders and files (shown below) are going to be created inside this .git directory when our project grows over time.
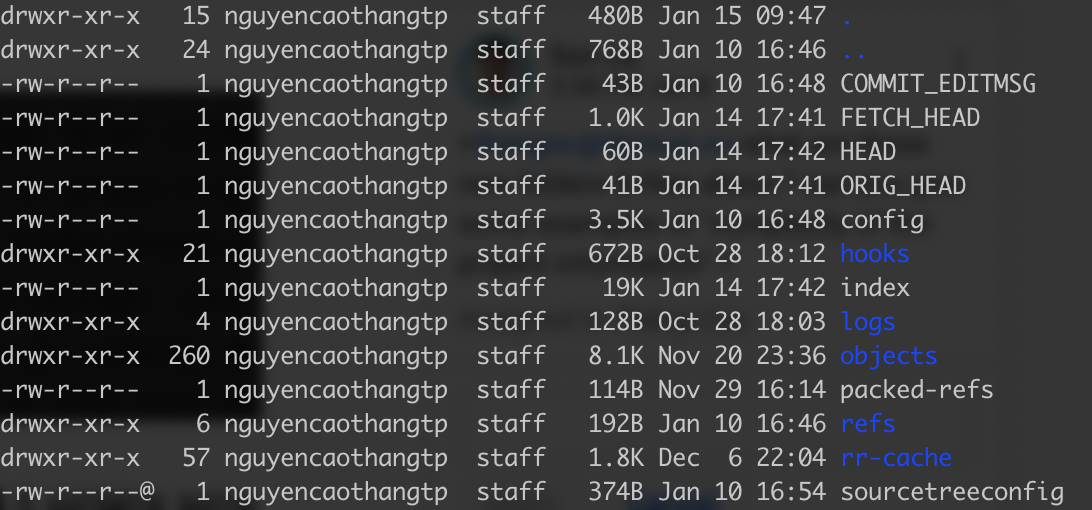
It depends on the complexity of the project information Git needs to track. The good news is we don’t need to deal with any of these files. Except for maybe the config in some cases.

If you take a look at that config file at .git/config, you can see that it contains some configuration information.
We could configure some user-level configurations, and at the same time, we can also configure our project. And if we did, this file is where Git would store it. And we should leave the rest of it alone and allow Git handles things itself. We don’t really need to go poking around in here very much. What to keep in mind is that this Git directory is all of Git’s tracking. If we were to delete this Git directory, Git would be removed from the project. There would be no tracking information left anywhere on our hard drive once we throw it away.
This directory is tracking.
That’s a little different from SVN or Subversion if you’ve used it before. SVN puts little files in every single directory that peppers them out through everything that’s tracking, and if you want to remove SVN from a project, you have to go and dig through the files and remove each and every little files that keep track of things. Git doesn’t work that way. Git centralizes everything into this one directory. The .git directory contains everything that Git is keeping track of in this project. And deleting that folder will erase everything Git knows.
Also published on

Share post on


Related Articles

Why Developers Say LangChain Is “Bad”: An Honest Look At LangChain
Why Developers Say LangChain Is “Bad”: An Honest Look At LangChain Published June 23, 2026
What Is RAG Status In Project Management? Red-Amber-Green Explained
What Is RAG Status In Project Management? Red-Amber-Green Explained Published June 23, 2026
15 Lifestyle Business Ideas for Creators, Freelancers, Solopreneurs
15 Lifestyle Business Ideas for Creators, Freelancers, Solopreneurs Published February 25, 2026