


How to Deploy Meteor App and Scale Meteor App in 2025?
February 18, 2025
Now, it’s time to get your hands dirty. Ready? I’m going to show you how to deploy and scale your Meteor App. FYI: This is one of two topics of our 2nd Meteor Meetup on July 9th, 2016. The author is Tai Nguyen, a young talent member of Designveloper.
What to Consider Before Deploying a Meteor App?
Deploying a Meteor app, however, bears a strong resemblance to deploying other kinds of software, and is much easier, especially when you are familiar with working on a WebSocket-based Node.js app.
Since it is a must to bring your app into play after all of your effort to develop, I would love to dig deep into what you should take into consideration before deploying. In this blog, I am going to list some of the essential stuff like this, including deployment environments, variables, domain name, SSL certificate, and CDN.
1. Deployment environments
Deployment environments in Meteor include three server tiers that are Development, Staging, and Production:
- Development: This is where you develop new features for the app and run local tests. If your app runs successfully with the code, it will move to the Staging.
- Staging: This environment is made to resemble the Production environment but is invisible to users. Here, your application will be checked on all features as well as performance before being released.
- Production: After your app goes through the test in Staging, it is officially deployed for users to interact directly with.
Deployment environments can explain in great detail at:
- https://guide.meteor.com/deployment.html#environments
- https://en.wikipedia.org/wiki/Deployment_environment
Please check out the list of "Meteor for Beginners - Easy and Practical" videos:
2. Environment variables and settings
Make sure environment variables and settings all are available for your deployment process.
- Environment variables comprise a set of dynamic named values ENV_VARS such as MAIL_URL, MONGO_URL, ROOT_URL, and NODE_OPTIONS. They can affect the way running process which is, in this case, Meteor. Without environment variables, settings could not configure when running in production.
One reliable destination for getting variables is https://nodejs.org/api/process.html#process_process_env
- Settings help you store all the important information of your app in each environment and have the form of settings.json. You can create a settings.json file and run it by using the command line
meteor run --settings settings.json.
or put it into the METEOR_SETTINGS environment variable.
3. The domain name, SSL Certificate and CDN
Remember to register a domain name for your site, so that users can access your site. Then, it is absolutely necessary for you to generate an SSL (Secure Sockets Layer) certificate.
CDN (Content Delivery Network or Content Distribution Network), in spite of being optional, should be set for your site. With CDN, content and images will deliver to end-users with high-quality and high performance
Read more at https://guide.meteor.com/deployment.html#cdn. That brings me to the end of this blog. In the next blog, I am going to show you how to deploy a Meteor app in reality. Stay in touch and I will keep you updated.
How to Deploy Meteor App and Scale Meteor App?

Step 1: Create Servers
To begin with, I create 4 servers in AWS (Amazon Web Service) with 4 different IP addresses:
I have chosen the domain which is www.ami.com for the app. I use MongoDB because it is the default database of Meteor. There we’ve got:
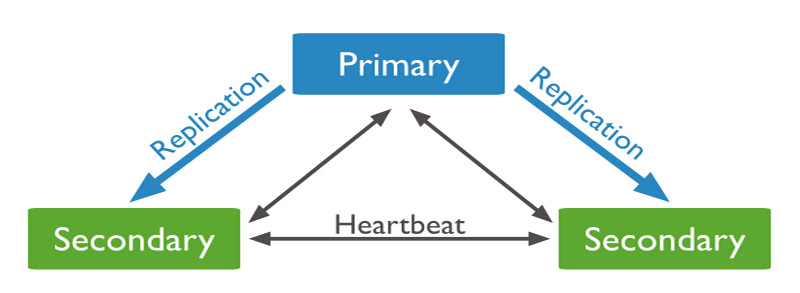
Step 2: Install MongoDB Replication
Replication sets provide redundancy and increase data availability on different database servers. Hence, I apply replication to increase the performance of reading operations.
At first, I create an admin user following precise instructions on https://docs.mongodb.com/v2.6/tutorial/add-user-administrator/ and generate a key-file by doing exactly guides on https://docs.mongodb.com/v2.6/tutorial/generate-key-file/
Next, I apply SSH (Secure Shell) to all 4 servers and run the following commands
>cd ~/
> mkdir mongodb/
> screen -S mongodb
> mongod --dbpath mongodb/ --replSet Ami --auth --keyFile mongo-keyfile
To close the terminal session, I use the hotkeys “CTRL + a + d”.
Then I turn 54.174.9.184 into primary MongoDB by running the following commands:
> mongo
> use admin
> db.auth(‘admin’, ‘password’)
> rs.initiate()
> rs.add(‘54.174.9.185:27017’)
> rs.add(‘54.174.9.186:27017’)
> rs.add(‘54.174.9.187:27017’)
Step 3: Setup your application
In order to set up the app, the first thing I need to do is to install meteor up by using npm. Below is the command line to use:
> npm install -g mupSetting up is a must. To do this, use the cd path command to go to the folder which contains the settings file of the application:
> cd path/to/settings
> mup init
This is how I scale the app. In this file, I edit the mup.json file by:
1. Adding servers
{
      "host": "server-1.ami.com",
      "username": "ubuntu",
      "pem": "./ssh.pem",
      "env": {
        "CLUSTER_ENDPOINT_URL": "https://server-1.ami.com",
        "CLUSTER_BALANCER_URL": "https://server-1.ami.com"
      }
    },
    {
      "host": "server-2.ami.com",
      "username": "ubuntu",
      "pem": "./ssh.pem",
      "env": {
        "CLUSTER_ENDPOINT_URL": "https://server-2.ami.com",
        "CLUSTER_BALANCER_URL": "https://server-2.ami.com"
      }
    },
    {
      "host": "server-3.ami.com",
      "username": "ubuntu",
      "pem": "./ssh.pem",
      "env": {
"CLUSTER_ENDPOINT_URL": "https://server-3.ami.com",
        "CLUSTER_BALANCER_URL": "https://server-3.ami.com"
      }
    },
    {
      "host": "server-4.ami.com",
      "username": "ubuntu",
      "pem": "./ssh.pem",
      "env": {
        "CLUSTER_ENDPOINT_URL": "https://server-4.ami.com",
        "CLUSTER_BALANCER_URL": "https://server-4.ami.com"
      }
    },
    }
2. Adding MONGO_URL
MONGO_URL is one of the environment variables in Meteor, which is used for connecting to Mongo in the production environment. To add MONGO_URL, I run the following command:
{
“MONGO_URL"        : "mongodb://lumin:[email protected]:27017, 54.174.9.185:27017, 54.174.9.186:27017, 54.174.9.187:27017/Ami?replicaSet=Ami"
}
3. Enable OPLOG
Oplog or operation log is a special collection that records all the write operations as they are applied to the database (you can find more helpful information at https://github.com/meteor/docs/blob/version-NEXT/long-form/oplog-observe-driver.md)
The command used to enable Oplog is as followed:
{ MONGO_OPLOG_URL: ‘mongodb://lumin:[email protected]:27017, 54.174.9.185:27017, 54.174.9.186:27017, 54.174.9.187:27017/ local?authSource=admin
}
Step 4: Deploy the app
Are you done all of these above steps? Let’s move to deploy our app. Firstly, I go to the settings folder of the app.
- Setup servers when using MUP for the first time
> mup setup- Bundle your project and deploy it to servers
> mup deploySo far, I have deployed my app successfully. MUP also supports other useful commands to maintain your production app. After you’ve edited the environmental variables of settings.json, you can reconfigure the app without deploying again:
> mup reconfigCheck out other useful commands:
> mup stop # stop all servers
> mup start  # start all servers
> mup restart  #  stop all running servers and start it again
Congratulation! Your Meteor app is now ready to dance to your tune. Keep an eye out for our further blog on Meteor tutorials and you will find out more helpful information. I would love to know whether you deploy your app successfully or not in the comments below.
Also published on

Share post on


Related Articles

10 Best Web Development Languages for Front-End and Back-End
10 Best Web Development Languages for Front-End and Back-End Published December 19, 2025
Typescript and JavaScript: A Complete Comparison
Typescript and JavaScript: A Complete Comparison Published November 21, 2025
WebAssembly vs JavaScript: Key Differences, Performance & Use Case
WebAssembly vs JavaScript: Key Differences, Performance & Use Case Published November 20, 2025Read more topics

AI Development
AI Development

Automation Technologies & Solutions
Automation Technologies & Solutions

Back-End Development
Back-End Development

Best Companies
Best Companies

Blockchain Technology and Applications
Blockchain Technology and Applications

Business Analyst Role & Skills
Business Analyst Role & Skills

Chatbot Development
Chatbot Development

Cloud Technology Revolution
Cloud Technology Revolution

CMS Platforms Development
CMS Platforms Development

Cyber Security
Cyber Security