


If you’ve ever wondered how to use AI in an app, our guide breaks it down into steps that actually make sense. You don’t have to be overly technical to follow along; we’ll explain things clearly, with real-world examples and tools that developers actually use. Whether you’re new to all of this or have some experience, this is a straightforward look at how to get it done.
Why Integrate AI at All?
Before we start, we want to briefly cover why it makes sense to integrate AI into an app in the first place. AI is no longer just a buzzword. It can lead to faster user journeys, higher retention, and even new revenue streams. For example, recommendation models can drive upsells in shopping apps, smarter search can reduce friction in content-heavy platforms, and duplicate detection can clean up photo libraries in a way that actually saves users time. These are specific, measurable improvements that users feel.
And it’s worth noting, AI isn’t slowing down. The tools, models, and frameworks are improving fast, which means the earlier you start working with them, the easier it’ll be to stay current and competitive. This isn’t a trend to watch from the sidelines.
FURTHER READING: |
1. How Does AI Affect Our Daily Lives? - Top 10 Goods & Bads |
2. Will AI Replace Programmers? Friend or Foe? |
3. How has Generative AI Affected Security? A Comprehensive Analysis |
6 Steps to Integrate AI Into an App the Right Way
We decided to put this guide together in a step-by-step format to keep things clear and easy to follow. It reflects the general order of things based on what we’ve seen work in real projects.
Let’s jump straight into the first step.
Step 1: Choose the Right Use Case
Before anything else, take a look at how mobile apps are already using AI. It’s proven ideas that solve a clear problem. Some of the best use cases are already in your pocket, doing their job without calling attention to themselves.

- Image recognition and vision is one of the most popular applications. Think about Google Photos, it can automatically group pictures of the same person, find landmarks, or even spot screenshots. That’s AI behind the scenes. On iOS, Apple’s Vision framework makes this type of thing accessible. It includes built-in tools for recognizing objects, faces, and text. It even lets you compare photos by generating a “feature print” for each one. Developers use this to build duplicate photo finders or similar-image detectors. If the feature distance between two photos is small enough, say, under 0.5, they’re likely the same image, or close.
You can take a look at Clever Cleaner, a free iPhone storage cleaner app that’s a great example of this kind of AI implementation. The grouping of similar photos is surprisingly accurate, and its “Best Shot” suggestions usually pick the right one to keep. It uses AI to analyze visual content and make smart choices that would otherwise take forever to do manually. You’ll find more apps like this on the App Store or Google Play, but not all of them implement AI equally well. If this niche sounds like your thing, test a few for yourself, it becomes pretty clear which ones are actually powered by AI. - Then there’s natural language and chatbots. Apps like Duolingo use AI-powered bots to hold conversations. Siri does it too, obviously, but you can plug in tools like GPT or other NLP services to make your app more responsive to typed or spoken questions. If you want to add smart replies or auto-summarize something a user said, NLP is how you do it.
- Personalization and recommendations are everywhere. Netflix, Spotify, Amazon – they all use AI to predict what you want to see next. That same logic can apply to smaller apps too. If you know how a user behaves, you can surface better content, offer shortcuts, or highlight features they’ll probably use.
- Automation is another strong fit. Banking apps use AI to scan and auto-fill checks. Health apps analyze sensor data to give personalized insights. AI lets you cut down on the manual work users have to do. You feed it a picture or a data stream, and it fills in the blanks.
- Voice and sound recognition shows up in apps like Shazam or Apple’s Voice Memos. Whether it’s identifying a song, converting speech to text, or triggering an action with your voice, this is AI at work too. You don’t have to build a model from scratch; Apple’s Speech framework and third-party APIs make this easy to plug in.
- And finally, augmented reality. ARKit helps you place digital objects into real-world scenes, but AI helps make sense of what the camera’s looking at. In games like Pokémon Go, AI models detect surfaces and guide the placement of virtual elements. It’s all in real-time.
You can’t implement AI into an app unless you know what you’re building toward. So think clearly about what you want AI to help with (and whether that feature is something users actually need). The more grounded your use case, the smoother the rest of the process will be.
Step 2: Pick the Right Tools to Implement AI Into an App
Once you know what your app needs to do, it’s time to choose the right tools to make it happen. If you’re building for iOS, Core ML is Apple’s go-to framework for running machine learning models on-device. It works well with the Vision framework for image tasks and supports fast, offline processing using the Neural Engine.
If you want to train a custom model without tackling Python, Create ML lets you do that directly on your Mac using your own images or data. For more advanced or cross-platform needs, you might use TensorFlow Lite, or connect to cloud services like Google Cloud Vision, OpenAI, or Firebase ML Kit.
The key is to match the tool to your use case:
- Core ML for fast, private, on-device features.
- Cloud APIs for more complex or frequently updated models.
Don’t overbuild; start with what’s practical.
Step 3: Train or Find a Model to Incorporate AI Into App Features
Now that you’ve picked your tools, the next step is getting a model.
You can either find a pre-trained one that fits your needs or train your own using labeled data. For common tasks like image classification, object detection, or text analysis, there are plenty of ready-made models available from Apple, Google, or open-source libraries. These are easy to integrate and often good enough to get things working quickly.
But if your use case is more specific, like identifying your own product catalog or recognizing certain types of user-submitted content, you’ll need to train a custom model. Create ML is a good option here. You can feed it labeled images, text, or tabular data, and it’ll produce a Core ML model tailored to your needs. For more control, tools like TensorFlow or PyTorch are widely used too.
Whether you go with a pre-trained model or build your own, the important part is that it fits your goal and your data. You just need something that performs well for the specific task your app is handling.
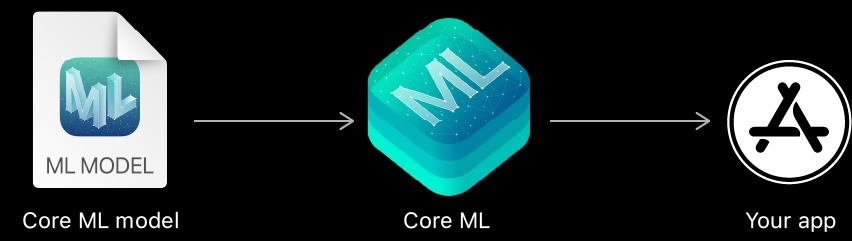
Step 4: Convert and Prepare the AI Model for Integration
Once you’ve got your model (whether it’s custom-trained or downloaded), you need to get it into a format your app can actually use.

On iOS, that means converting it to a Core ML model file (.mlmodel). If you trained the model in Create ML, you’re already set. But if it came from TensorFlow, PyTorch, or somewhere else, you’ll likely need to use coremltools, Apple’s official converter.
The conversion step maps out the model’s inputs and outputs, so your app knows what kind of data to feed in and what kind of predictions to expect back. After that, you’ll drag the .mlmodel file into Xcode. It automatically generates a Swift class for you, so calling the model is as simple as passing in the input and reading the result.
At this stage, it’s worth double-checking the input requirements, image size, text format, etc., so you don’t run into runtime errors. Small adjustments here will save you a lot of troubleshooting later.
Step 5: Integrate AI Into Your App
With your model ready to go, it’s time to plug it into your app. If you’re working on iOS, Core ML makes this surprisingly smooth. Once you add the .mlmodel file to your Xcode project, it generates a class that you can call like any other Swift object. You feed it the input, and it gives you the prediction result.
For image tasks, you’ll often use Vision alongside Core ML. Vision helps preprocess the image and run it through the model, which is especially helpful if you’re dealing with camera input or want to do things like face detection, object tracking, or finding similar photos. For example, if you’re building a duplicate photo finder, you can use Vision to generate feature prints and compare the distance between them.
If you’re building a cross-platform app or want quick access to prebuilt models, Firebase ML Kit is a solid alternative. It handles things like text recognition, image labeling, and face detection right out of the box.
The code to run a model usually takes just a few lines. Most of the effort goes into shaping the input and handling the output in a way that makes sense for your app’s UI.
Step 6: Test, Optimize, and Update Your AI Implementation
Once the AI feature is wired into your app, don’t assume you’re done. You need to test how it actually performs on real devices and with real data. If you plan to use AI in a mobile app, this part matters as much as the initial setup.
Start with the basics: does the model return results quickly? Is it accurate enough? If you’re doing something visual, check how well it handles different lighting, angles, image types.
On-device models like those running through Core ML are fast, but they still use memory and processing power. You’ll want to pay attention to performance on older devices. Core ML automatically takes advantage of the Neural Engine when it’s available, but you should still monitor how your feature behaves in practice. If you’re comparing images using Vision, experiment with similarity thresholds. For example, a feature distance under 0.5 might mean “duplicate,” but you may need to tweak that based on your dataset.
Also, think about how you’ll keep your AI feature current. If the model needs updates over time (maybe your data changes or you improve accuracy), you can ship new versions in app updates or use cloud-based models that load remotely. And if you’re working with user data, make sure you’re compliant with privacy guidelines, especially if anything leaves the device.
The main idea here is to treat your AI feature like any other part of your app: test it thoroughly, improve it when needed, and make sure it’s actually helping users.
FURTHER READING: |
1. What is Hybrid App Development? |
2. Cloud-Native Applications: Unlocking the Power of the Cloud |
3. 120 Mobile App Ideas to Earn Big Money [Updated for 2026] |
Final Tips
Before you call it done, here’s a quick checklist to help you stay on track. Don’t think of these as rules; it’s just a set of things we’ve seen firsthand that some developers overlook or don’t prioritize enough when they integrate AI into an app.
- Start simple. Use prebuilt models or APIs when you can. Apple’s sample models (like MobileNet or SqueezeNet) and ML Kit’s built-in tools are fast ways to get working results without building everything from scratch.
- If your app handles personal data, be transparent about it. Keep processing on-device when possible. If you need to send data to the cloud, encrypt it and follow the platform guidelines.
- Test for performance. What looks fine in the simulator can lag on a real device. Use small input sizes where it makes sense, and make sure your AI tasks don’t block the UI.
- Bigger models aren’t always better. If a small model works well enough, go with that. For heavier tasks that need better accuracy, cloud inference might be a better option (just be mindful of latency and connectivity).
- AI isn’t static. Watch how users interact with the feature and be ready to refine or retrain your model. Cloud-based models can be updated anytime. On-device models will need to be bundled with app updates.
- Not every prediction will work. Handle failures clearly and without breaking the experience. Whether the issue is offline mode, bad input, or model error, your app should know how to recover.
Trust us, these small checks can save you headaches later. We’ve seen what happens when they’re skipped. It’s worth slowing down for a moment to make sure everything’s solid before your AI feature goes live.
Also published on

Share post on


Read more topics


You may also like

Agentic AI Single vs Multi-Agent Systems: Key Differences
Agentic AI Single vs Multi-Agent Systems: Key Differences Published March 04, 2026
Agentic AI Security: Risks, Core Architecture, Solutions
Agentic AI Security: Risks, Core Architecture, Solutions Published March 03, 2026
How to Build Agentic AI: Practical Guide with Examples
How to Build Agentic AI: Practical Guide with Examples Published March 02, 2026